

Dear Beloved Readers,
Today we create a gallery wall!
A very little bit of backround, my close friends obviously know I’m an interior designer so they use my skills shamelessly. But it’s ok because I love them and my job is fun so I won’t turn down an opportunity to make their homes fantastic!
Brainstorming.
So when my best friend asked me to help her make a gallery wall, my answer was “Duh”.
Step one in our ventures was to go to Hobby Lobby. If you are so blessed to have a Hobby Lobby close by then USE THEM! They have the cutest stuff and an entire section of the store dedicated to wall art. We spent a good 30 minutes there just walking through the art.


We didn’t pick anything out yet because she wasn’t quite sure what she wanted or how much she wanted to spend. So when we got home she went to hobbylobby.com and found all the pieces she loved, on sale. We took that as a sign from God and she picked out all her pieces. I’m very proud of her for taking the initiative and choosing her own pieces. I just had approve them.
Assembling.
Fast forward 7 business days and all of the art peices had arrived! They were all so cute and different and worked great with the pieces she already had. Probably the most important thing you can do when creating a gallery wall is to have variety. Choose pieces with different shapes, different styles, but still within a cohesive color scheme. Her house is mostly brown, blue, and red so she chose pieces that fit into the farmhouse rustic style.
Before we even brought out the hammer, we layed out all her pieces in the floor. It’s important to try multiple layouts, and take pictures of them, so you can decide which design to use. The pieces will usually speak to you when they have found their place in the design.
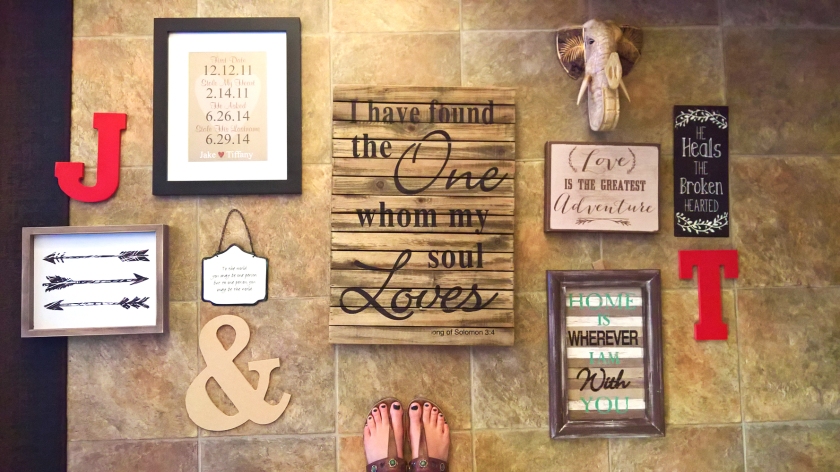
During this layout phase is also the time to think about spacing. We started out with about 2″ of space between each piece but ended up spreading it to 3″ to fit the whole design over her sofa.
We did also add a color of paint on some of the pieces after deciding where they were going to go.
Hanging.
Hanging is where the fun/madness begins. If you have a solid layout to begin with, hanging should be pretty painless. Excpet for when you are OCD and have to have everything spaced exactly. For some, command strips may be your best friend. But because we live in military housing, there a million layers of paint and command strips just aren’t dependable. Nails it is!
When you hang your gallery wall, start with the center piece and work out. So we started with the large quote piece. We centered it above the couch both horizontally and vertically. I did raise it a few inches so nothing would be near peoples’ heads. Once the foundation piece was in place we started spreading out.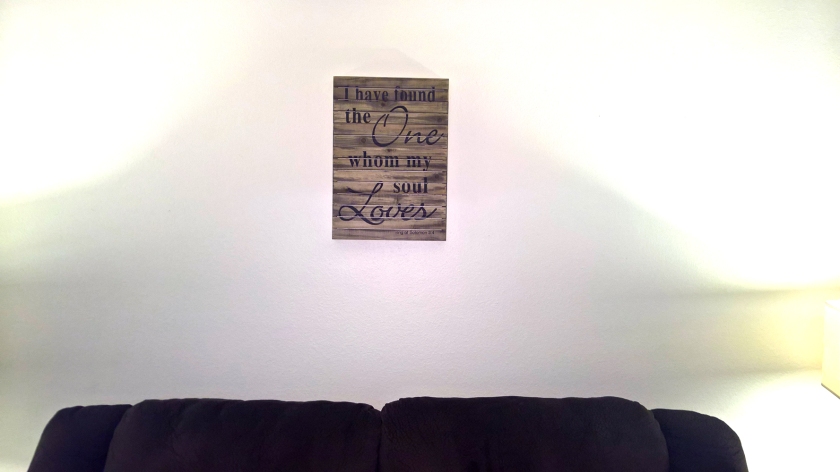
It really only took about 30 minutes to hang all of the pieces. This really surprised me, but I didn’t complain.


Enjoying.
The end product is fabulous. We are both so thrilled with how well this turned out. BUT of course, no project is complete with a cat. The last and most crucial step to the gallery wall process is an instagram post of your cat with the hashtag, #catswithstyle.


Did I mention he has thumbs?

I love the idea ! It looks great 🙂
LikeLike
Thanks! I love how it turned out!
LikeLiked by 1 person